Under the Hindu kings, palm leaf manuscripts upon which sastra are recorded were recopied every 100 years or so to preserve them. Since British times this process has ceased and existing manuscripts, even in the best-preserved collections, are deteriorating, some already to the point of uselessness. Transferring the manuscripts to Microfilm is relatively expensive and requires bulky equipment. The resulting product, film, needs a separate process of digitization to distribute by the Internet.
Preservationists are increasingly relying on the use of digital cameras for the purpose of rapid photography and preservation of the leaves. The system is much simpler, cheaper and less technical than microfilm, and the results are easily posted to the Internet. The following is a description of the overall methodology employed to reproduce and preserve these transcendental treasures.
Introduction
The newest digital cameras are suitable for photographing the palm leaf manuscripts upon which are recorded Hinduism’s scriptures. Under the Hindu kings, these manuscripts were recopied every 100 years or so to preserve them. Since British times, this process has ceased and existing manuscripts, even in the best-preserved collections, are deteriorating, some already to the point of uselessness. In consultation with scholars in Tamil Nadu, Kauai Aadheenam has investigated the used of digital cameras for the purpose of rapid photography and hence preservation of the leaves. The system is much simpler, cheaper and less technical than microfilm. While it is true that a flatbed scanner can give better results, it is not practical to use with palm leaves. Scanners are too slow and present logistical difficulties.
Equipment
This demonstration was done with a Nikon D50 camera, a 6.1 megapixel unit purchased for $450 with a 50 mm f1.8 AF D Nikkor lens costing $125. This is a mid-range digital camera in terms of cost. Additional camera equipment included a Kaiser R3 copy stand ($115, used), a Nikon SB-600 speedlight ($180), a remote control for the camera ($18) and miscellaneous items — all for under $1,000. It is important than the internal camera flash as well as any strobe used have manual capabilities. Auto and TTL functions will not give consistent results. The photos were processed on a Power Macintosh G5 with 5 GB of ram using Adobe Photoshop CS program. A computer need not be dedicated to the project as processing time for the images is quick and largely automated.
Identification of Leaves
It was concluded in discussion with experts to photograph next to the leaf the name of the manuscript and the number of the leaf. In the future any individual digital image may be easily identified, regardless of the file name attached to it. This is accomplished by the low-tech method of taping the bundle name in the camera’s field of view along with a counter that is incremented by hand with each leaf and side. In theory, one could set up the camera “tethered” to and operated by the computer, and insert names and numbers automatically in the image. This would, however, add a layer of complexity that seems unnecessary.
Camera Settings
The Nikon D50 camera has been set up in this case to photograph a leaf 8.25″ long. Exposure settings will need to be adjusted for each size of leaf. The Nikon is set at f8, which is the aperture of choice, 1/16 power on the in-camera flash, spot focus, white balance for flash, ISO 200 and flash compensation level at 0. The quality is set to “fine,” the highest pixel count the camera can output in .jpg format. Nothing was gained by use of camera raw, and the added time to work with the images was substantial. The exposure may be evaluated with the “levels” command in Photoshop to see that the histogram is nicely centered in the graph. A histogram to the left or right would indicate over- or under-exposure.
Copy Stand Background
It was found by experimentation that the color of the background was critical. It affected both the image produced by the camera and the ease of manipulating the image in Photoshop. A blue background (approximately PMS 298) gave good results. It is important that the background color be flat, with no sheen which will reflect the camera flash. The copy stand board can be spray painted with a flat blue paint.
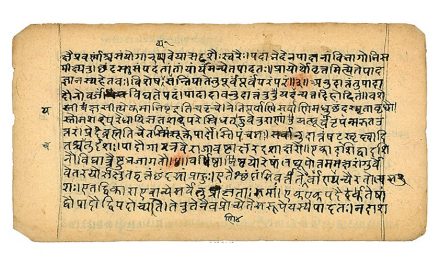
Photographing the Leaves
The following video is narrated by Arumugaswami, managing editor of Hinduism Today. It shows the process of photographing the leaves. Marks have been made on the blue paper on the copy stand to indicate where to place the leaves. It is important the leaves are put in the same place in every photo. The camera and copy stand have both been has been leveled with a small spirit level. Check the spirit level on the camera every time it is removed from the copy stand or the battery removed. Rotating the camera body out-of-alignment is always possible. If the camera is not parallel to the copy stand, lots of time and effort will be wasted as the leaves will photograph unsharp from side-to-side. The same goes for any changes to the copy stand platform. The counter is taped to one corner of the photo, and the identification of the bundle taped next to the leaf. As will be seen later, the counter and the bundle ID tag can actually be anywhere in the frame, but they must always be in the same place for a given bundle. They can be cut and pasted in Photoshop to be close to the leaf. Because of the placement of the camera on the copy stand, the leaves, while facing the operator are actually photographed up-sidedown. This is also automatically fixed in Photoshop.
The procedure is quite simple, in fact, the monotony of it is a hazard. The counter is set to one, the leaf position correctly on the copy board and the camera set off by the remote control button. The leaf is flipped, the counter incremented and the camera fired. There should be a procedure to check every several hundred photos to be sure the bundle identification is correct and the counter accurate. A new leaf is placed on the copy board, the counter incremented, and so on. In tests, once everything was in place, a leaf could be photographed on both sides in about 15 seconds, a rate of 240 leaves per hour. Given four hours of actual shooting in a day, leaves could be photographed at the rate of 960/day with one camera setup. In the video, we intended to shoot 50 leaves, but forgot to clear the SD card, so got through just 35.
Processing the Photos
Once the leaves are photographed, the SD card from the camera is transfered to the computer and the images downloaded. The Photoshop processing proceeds through these automated steps: 1) selects and reduces in size the counter number; 2) moves the counter number next to the bundle label; 3) rough crops the image; 4) rotates the image 180°; 5) selects the blue background in a series of steps; 6) deletes the blue background; 7) recrops the image more tightly; 8) saves the image out as a color .jpg file, quality “2” in the Photoshop. Test determined that there is no noticeable degradation of image quality all the way from 12, the highest .jpg compression, to 2. We think this is because of the small color range in the leaves. There was also little file size reduction by changing the photos to grayscale. No color correction or sharpening was attempted as the images are legible as they are.
Leaf Size
The leaves used in this demonstration are 8.25 inches wide. Below is a photo of two leaves set end to end, with a width just under 16.5 inches. The camera stand was not quite tall enough to get the entire leaves in. As you can see, the resulting image (below) is still legible. The camera was 38 inches from the copy board, it was set at f6.3 with 1/8th power flash. Sixteen inches wide is probably the limit for a 6.1 megapixel camera, and larger leaves would have to be photographed in two sections. Megapixel size may not have an influence on better reproduction of longer leaves. Lens resolution at a greater distance is a more important factor. If lens sharpness falls off at the edges, a larger file size will not improve sharpness.
File Naming and Web Posting
Once cropped, the files can be renamed with the bundle name and leaf number by an automated program such as iView. Posting to the web is simple, they are uploaded to a directory with the bundle name and then appear as individual files, as in the files referenced above. The cropped files run about 200k. For an collection of 250,000 leaves, that would be 100 GB of information, which can be easily handled on today’s web sites. The same files would fit on 22 DVD’s.
Procedure Options and Storage
The cropping of the images need not be done on site where the leaves are kept. A workable option is to have the camera and a laptop computer on site, download the images to the laptop and burn on DVDs, then send to a facility for processing. Consider a collection of 250,000 leaves, meaning 500,000 images (both sides of the leaves). The original files from the Nikon D50 camera are 2.8MB. Approximately 1,600 2.8MB images can be put on a 4.7 GB DVD. The 500,000 images would require 312 DVD’s, which cost about 40 cents each. The files can also be kept on hard drives, with a required space of 1.5 terabytes. Currently one can buy a one terabyte (that’s a million megabytes) drive for $400. The advantage of shipping the full images to a central place is that the technical expertise required on site is reduced. The on-site personnel only have to deal with the correct exposure settings for the camera and not the cropping, web posting, etc. All of the subsequent processes are highly automated. One need only manually create a Photoshop “action” for each leaf bundle (as the bundles are all different sizes). All subsequent processes, including posting to the Internet, can happen automatically.